Overview
Using Strolch as a PLC has certain advantages and disadvantages. The following is a list of advantages:
- Same programming model and language for server and PLC
- PLC has the same privilege handling as in Strolch
- Simulating down to the PLC level is easily possible for easier testing of server logic
Of course using the Java language as a PLC has its limitations, we have manage to use it for customers and are satisfied with the result. What follows is a description in how to set up your own Strolch based PLC.
Checkout the code at GitHub
Architecture
Overview

The Strolch PLC architecture sees the Strolch Agent as the server, managing logical devices, i.e. multiple sensors and actors together and thus deciding on further steps. With this architecture multiple PLCs can be combined together in one agent for flow control.
PLC Architecture
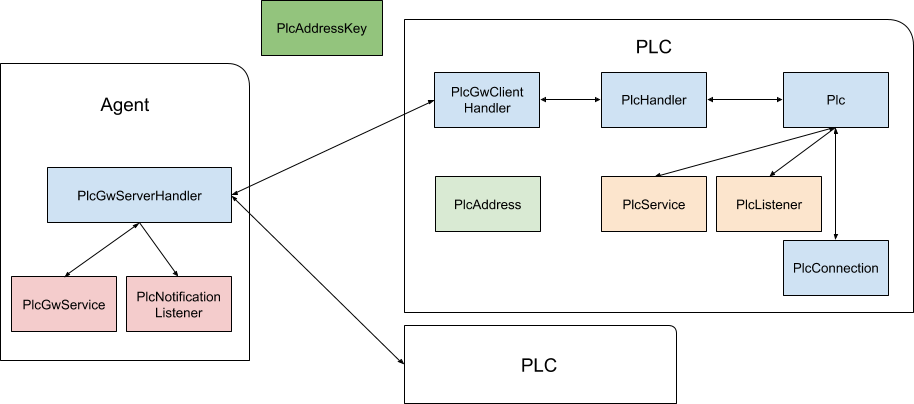
On the agent side the two main classes are the PlcGwServerHandler and the
PlcGwService
The PlcGwServerHandler handles connections from remote PLCs over WebSockets and sends the
requests to these PLCs. A PlcGwService instance will be notified and can then decide on an
action. In an execution model with Activities, the PlcNotificationListener
interface can be implemented, or the PlcExecutionPolicy can be directly extended.
On the PLC side, the PlcGwClientHandler is optional if no agent is required. The PlcHandler
initializes the model and connections. The Plc class is Strolch agnostic and manages the
connections and notifies PlcListener instances on changes coming from the underlying
connections. The PlcService implementations implement business logic, and can also be notified
on updates from connections.
Example set up
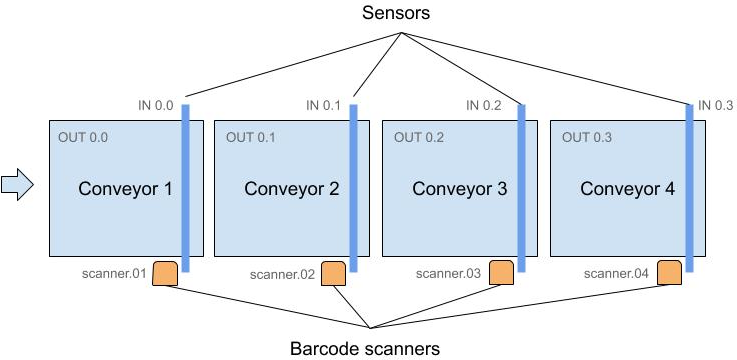
This example setup describes the movement of containers over conveyors. The conveyors have motors which can be started and stopped by a GPIO output pin controlled on a Raspberry Pi and each conveyor has a light barrier to detect the occupancy of a container and the Raspberry Pi detects this on GPIO input pins.
Further at each conveyor location is a barcode reader to read the ID of a container.
The general idea is that the PLC notifies a Strolch agent of changes, and only turns conveyors on, when the agent gives the command. Thus the agent handles business logic and the PLC controls the I/Os.
New Project
- First create a new Strolch Web project using the Strolch Maven archetype
- Now add the following Maven dependencies:
<properties> <strolch.version>1.6.0-SNAPSHOT</strolch.version> <strolch.plc.version>0.1.0-SNAPSHOT</strolch.plc.version> </properties> <dependencyManagement> <dependency> <groupId>li.strolch</groupId> <artifactId>li.strolch.bom</artifactId> <type>pom</type> <version>${strolch.version}</version> <scope>import</scope> </dependency> <dependency> <groupId>li.strolch</groupId> <artifactId>strolch-plc-bom</artifactId> <type>pom</type> <version>${strolch.plc.version}</version> <scope>import</scope> </dependency> </dependencyManagement> <dependencies> <!-- PLC --> <dependency> <groupId>li.strolch</groupId> <artifactId>strolch-plc-core</artifactId> </dependency> <dependency> <groupId>li.strolch</groupId> <artifactId>strolch-plc-rest</artifactId> </dependency> <dependency> <groupId>li.strolch</groupId> <artifactId>strolch-plc-gw-client</artifactId> </dependency> </dependencies> -
Add a bower dependency:
"strolch-wc-plc": "strolch-li/strolch-wc-plc#^0.3.4"tosrc/main/webapp/bower.jsonAfter adding the dependeny, run
gulpin the webapp directory. Gulp should have been installed through the instructions from the development page. -
Now we need to add the PLC web views to our new project. This is added in the
src/main/webapp/app/src/c-app.htmlfile. Add the following:<!-- HTML Imports --> <link rel="import" href="../bower_components/strolch-wc-plc/strolch-wc-plc-connections.html"> <link rel="import" href="../bower_components/strolch-wc-plc/strolch-wc-plc-logical-devices.html"> <!-- Change default-page to plcLogicalDevices --> <c-app-routing id="appRouting" login-page="login" default-page="plcLogicalDevices" auth-valid="[[authTokenValid]]" page="{{page}}" route-tail="{{routeTail}}" use-hash-as-path></c-app-routing> <!-- Add the new pages in the iron-pages element: --> <template is="dom-if" if="[[equal(page, 'plcConnections')]]" restamp> <strolch-wc-plc-connections id="plcConnections" base-path="../" base-rest-path="[[baseRestPath]]" route="{{subroute}}"></strolch-wc-plc-connections> </template> <template is="dom-if" if="[[equal(page, 'plcLogicalDevices')]]" restamp> <strolch-wc-plc-logical-devices id="plcLogicalDevices" base-path="../" base-rest-path="[[baseRestPath]]" base-ws-path="[[baseWsPath]]" route="{{subroute}}"></strolch-wc-plc-logical-devices> </template> // add a new property to the WebSocket path for observing changes on the PLC wsObserverPath: { type: String, value: function () { return CustomWeb.baseWsPath + "/plc/observer"; } } -
Don't forget to add the PLC Rest classes to your
ResourceConfig@ApplicationPath("rest") public class RestfulApplication extends ResourceConfig { public RestfulApplication() { ... // strolch plc services packages(PlcConnectionsResource.class.getPackage().getName()); ... } } -
Now we need to configure the PLC's runtime by modifying
runtime/StrolchConfiguration.xmland adding the following:<!-- This component configures the PlcHandler by loading the PlcConnections, PlcAddresses and PlcTelegrams --> <Component> <name>PlcHandler</name> <api>li.strolch.plc.core.PlcHandler</api> <impl>li.strolch.plc.core.DefaultPlcHandler</impl> <depends>RealmHandler</depends> <Properties> <!-- The component handling the low level connections --> <plcClass>li.strolch.plc.core.hw.DefaultPlc</plcClass> </Properties> </Component> <!-- This component handles registrations of the PlcServices, i.e. your PLC business logic --> <Component> <name>PlcServiceInitializer</name> <api>li.strolch.plc.core.PlcServiceInitializer</api> <impl>li.strolch.plc.example.CustomPlcServiceInitializer</impl> <depends>PlcHandler</depends> <Properties> </Properties> </Component> <!-- This component notifies a Strolch agent of changes on the PLC only if you have a Strolch server with a configured li.strolch.plc.gw.server.PlcServerWebSocketEndpoint ready to accept connections --> <Component> <name>PlcGwClientHandler</name> <api>li.strolch.plc.gw.client.PlcGwClientHandler</api> <impl>li.strolch.plc.gw.client.PlcGwClientHandler</impl> <depends>PlcHandler</depends> <depends>PlcServiceInitializer</depends> <Properties> <plcId>plc-01</plcId> <gwUsername>plc-01</gwUsername> <gwPassword>plc-01</gwPassword> <gwServerUrl>ws://localhost:8080/agent/websocket/strolch/plc</gwServerUrl> </Properties> </Component> -
Now we add the custom classes we just declared.
PlcServiceInitializer
import java.util.ArrayList;
import java.util.List;

import li.strolch.plc.example.services.*;
import li.strolch.agent.api.ComponentContainer;
import li.strolch.plc.core.PlcHandler;
import li.strolch.plc.core.PlcService;
import li.strolch.plc.core.PlcServiceInitializer;

public class CustomPlcServiceInitializer extends PlcServiceInitializer {

  public CustomPlcServiceInitializer(ComponentContainer container, String componentName) {
    super(container, componentName);
  }

  @Override
  protected List<PlcService> getPlcServices(PlcHandler plcHandler) {
    ArrayList<PlcService> plcServices = new ArrayList<>();

    StartupPlcService startupPlcService = new StartupPlcService(plcHandler);
    ConveyorPlcService conveyorPlcService = new ConveyorPlcService(plcHandler);

    plcServices.add(conveyorPlcService);
    plcServices.add(startupPlcService);

    return plcServices;
  }
}
PlcPostInitializer
import li.strolch.agent.api.ComponentContainer; import li.strolch.plc.core.PlcPostInitializer; public class CustomPostInitializer extends PlcPostInitializer { public CustomPostInitializer(ComponentContainer container, String componentName) { super(container, componentName); } // override the initialize(), start(), stop() and destroy() methods as needed } -
In the
CustomPlcServiceInitializerwe added two PlcServices, for which the code is missing. The following are simple examples:StartupPlcService
import li.strolch.persistence.api.StrolchTransaction;
import li.strolch.plc.core.PlcHandler;
import li.strolch.plc.core.PlcService;

public class StartupPlcService extends PlcService {

  public static final String PLC = "PLC";
  public static final String STARTED = "Started";
  public static final String STOPPED = "Stopped";

  public StartupPlcService(PlcHandler plcHandler) {
    super(plcHandler);
  }

  @Override
  public void start(StrolchTransaction tx) {
    send(PLC, STARTED);
    super.start(tx);
  }

  @Override
  public void stop() {
    send(PLC, STOPPED);
    super.stop();
  }
}
ConveyorPlcService
import java.util.concurrent.ScheduledFuture; import java.util.concurrent.TimeUnit; import li.strolch.plc.core.PlcHandler; import li.strolch.plc.core.PlcService; import li.strolch.plc.model.PlcAddress; public class ConveyorPlcService extends PlcService { public static final int BOX_TRANSFER_DURATION = 30; private static final String R_CONVEYOR_01 = "Conveyor01"; private static final String A_START_BUTTON = "StartButton"; private static final String T_MOTOR_ON = "MotorOn"; private static final String T_MOTOR_OFF = "MotorOff"; private static final String A_BOX_DETECTED = "BoxDetected"; private boolean motorOn; private ScheduledFuture<?> motorStopTask; public ConveyorPlcService(PlcHandler plcHandler) { super(plcHandler); } @Override public void handleNotification(PlcAddress address, Object value) { String resource = address.resource; String action = address.action; if (!resource.equals("Conveyor01")) throw new IllegalStateException("Unexpected resource " + resource); boolean active = (boolean) value; if (action.equals(A_START_BUTTON)) { if (active) { logger.info("Start button pressed. Starting motors..."); send(R_CONVEYOR_01, T_MOTOR_ON); this.motorOn = true; scheduleStopTask(); } } else if (action.equals(A_BOX_DETECTED)) { if (active && this.motorOn) { logger.info("Container detected, refreshing stop task..."); scheduleStopTask(); } } else { logger.info("Unhandled notification " + address.toKeyAddress()); } } private void scheduleStopTask() { if (this.motorStopTask != null) this.motorStopTask.cancel(false); this.motorStopTask = schedule(this::stopMotor, BOX_TRANSFER_DURATION, TimeUnit.SECONDS); } private void stopMotor() { send(R_CONVEYOR_01, T_MOTOR_OFF); } @Override public void register() { this.plcHandler.register(R_CONVEYOR_01, A_START_BUTTON, this); this.plcHandler.register(R_CONVEYOR_01, A_BOX_DETECTED, this); super.register(); } @Override public void unregister() { this.plcHandler.unregister(R_CONVEYOR_01, A_START_BUTTON, this); this.plcHandler.unregister(R_CONVEYOR_01, A_BOX_DETECTED, this); super.unregister(); } } -
Now the last part is to add the model, i.e. PlcConnections, PlcAddresses and PlcTelegrams. To have less configuration files and make it easier to reconfigure at runtime, this data is stored in normal Strolch
ResourcesIn this example we will use simple Raspberry Pi GPIOs. For convenience, and also when sharing I/O definitions with external partners, it is easier to use a CSV file to define the I/Os and then use the
PlcAddressGeneratorto generate and validate the model.For this purpose in this example, we will use one conveyor with 2 inputs and 1 output. The CSV file should have the following content:
Description,Type,SubType,Device,Pin,Resource,Action1,Action2,Connection,DeviceId
Material Flow,Group,,,,,,,,MaterialFlow
Conveyor 1,Input,Pin,,4,Conveyor,Occupied,,raspiBcmGpioInput
Conveyor 1,Input,Pin,,17,Conveyor,BoxDetected,,raspiBcmGpioInput
Conveyor 1,Output,Pin,,18,Conveyor,MotorOn,MotorOff,raspiBcmGpioOutput
The CSV headers are as follows:
- Description → a simple description for this PlcAddress
- Type →
- Group → Must be the first line and generates a PlcLogicalDevice, all succeeding lines are grouped to this device. Add additional to group further devices
- Input → defines a boolean input
- Output → defines a boolean output
- Virtual → defines a virtual address which has no corresponding hardware connection. Used for internal communication.
- DataLogicScanner → defines an address to read barcodes from a DataLogic Scanner. The actions must be left empty as the keys Barcode (address), On and Off (telegrams) will be generated.
- SubType →
- For Input and Output types →
- DevPin, DevPin0 → Generates the address as
<Connection>.<Device>.<Pin>. DevPin0 decrements the Device and Pin values by one. - Pin → Generates the address as
<Connection>.<Pin>.
- DevPin, DevPin0 → Generates the address as
- For Virtual types →
- Boolean
- String
- For Input and Output types →
- Device → Device number
- Pin → The pin number on the device
- Resource → The resource ID with which to notify the agent
- Action1 → The action ID
- Action2 → The second action ID if required
- Connection → The ID of the PlcConnection with which this I/O is attached
- DeviceId → For type Group: Set the ID of this PlcLogicalDevice being generated
When you use this file as input for the
PlcAddressGenerator, then it will generate PlcLogicalDevice, PlcAddress and PlcTelegram elements:<Resource Id="D_MaterialFlow" Name="MaterialFlow" Type="PlcLogicalDevice"> <ParameterBag Id="parameters" Name="Parameters" Type="Parameters"> <Parameter Id="description" Name="Description" Type="String" Value="Material Flow"/> <Parameter Id="group" Name="Group" Type="String" Value="01 Material Flow"/> <Parameter Id="index" Name="Index" Type="Integer" Value="10"/> </ParameterBag> <ParameterBag Id="relations" Name="Relations" Type="Relations"> <Parameter Id="addresses" Name="Addresses" Type="StringList" Interpretation="Resource-Ref" Uom="PlcAddress" Value="A_Conveyor-Occupied, A_Conveyor-BoxDetected, A_Conveyor-MotorOn"/> <Parameter Id="telegrams" Name="Telegrams" Type="StringList" Interpretation="Resource-Ref" Uom="PlcTelegram" Value="T_Conveyor-MotorOn, T_Conveyor-MotorOff"/> </ParameterBag> </Resource> <Resource Id="A_Conveyor-Occupied" Name="Conveyor - Occupied" Type="PlcAddress"> <ParameterBag Id="parameters" Name="Parameters" Type="Parameters"> <Parameter Id="description" Name="Description" Type="String" Index="5" Value="Conveyor 1"/> <Parameter Id="address" Name="HW Address" Type="String" Interpretation="PlcConnection" Index="10" Value="raspiBcmGpioInput.4"/> <Parameter Id="resource" Name="Resource ID for PlcAddress" Type="String" Index="20" Value="Conveyor"/> <Parameter Id="action" Name="Action ID for PlcAddress" Type="String" Index="30" Value="Occupied"/> <Parameter Id="index" Name="Index" Type="Integer" Index="40" Value="10"/> <Parameter Id="value" Name="Value" Type="Boolean" Index="100" Value="false"/> </ParameterBag> </Resource> <Resource Id="T_Conveyor-MotorOn" Name="Conveyor - MotorOn" Type="PlcTelegram"> <ParameterBag Id="parameters" Name="Parameters" Type="Parameters"> <Parameter Id="description" Name="Description" Type="String" Index="5" Value="Conveyor 1"/> <Parameter Id="address" Name="HW Address" Type="String" Interpretation="PlcConnection" Index="10" Value="raspiBcmGpioOutput.18"/> <Parameter Id="resource" Name="Resource ID for PlcAddress" Type="String" Index="20" Value="Conveyor"/> <Parameter Id="action" Name="Action ID for PlcAddress" Type="String" Index="30" Value="MotorOn"/> <Parameter Id="index" Name="Index" Type="Integer" Index="40" Value="10"/> <Parameter Id="value" Name="Value" Type="Boolean" Index="100" Value="true"/> </ParameterBag> </Resource>The PlcLogicalDevice references the PlcAddress and PlcTelegram objects, and is then used in the UI for grouping.
The PlcAddress is used to store the current value and defines the keys with which the agent will be notified
The PlcTelegram is used to store default values to send, for specific keys. E.g. The action
Onwould send true, andOffwould send false. This is semantics, and is defined in each project depending on the hardware. -
Copy the file plc-state.xml to your runtime and reference it by use of a
<IncludeFile file="plc-state.xml" />element. Modify the PlcId to be the same as the one you defined in theStrolchConfiguration.xml. - Now that we have a model, the PlcConnections are to be defined. In the previous example we used a
Raspberry Pi's GPIOs. This needs to be defined as a PlcConnection:
<Resource Id="raspiBcmGpioOutput" Name="Raspi BCM GPIO Output" Type="PlcConnection">
  <ParameterBag Id="parameters" Name="Parameters" Type="Parameters">
    <Parameter Id="className" Name="Connection Class" Type="String" Value="li.strolch.plc.core.hw.gpio.RaspiBcmGpioOutputConnection"/>
    <Parameter Id="state" Name="Connection State" Type="String" Interpretation="Enumeration" Uom="ConnectionState" Value="Disconnected"/>
    <Parameter Id="stateMsg" Name="Connection State Msg" Type="String" Interpretation="Enumeration" Uom="ConnectionState"
           Value=""/>
    <Parameter Id="inverted" Name="Inverted" Type="Boolean" Value="false"/>
    <Parameter Id="bcmOutputPins" Name="BCM Output Pins" Type="IntegerList" Value="27"/>
  </ParameterBag>
</Resource>
<Resource Id="raspiBcmGpioInput" Name="Raspi BCM GPIO Input" Type="PlcConnection">
  <ParameterBag Id="parameters" Name="Parameters" Type="Parameters">
    <Parameter Id="className" Name="Connection Class" Type="String" Value="li.strolch.plc.core.hw.gpio.RaspiBcmGpioInputConnection"/>
    <Parameter Id="state" Name="Connection State" Type="String" Interpretation="Enumeration" Uom="ConnectionState" Value="Disconnected"/>
    <Parameter Id="stateMsg" Name="Connection State Msg" Type="String" Interpretation="Enumeration" Uom="ConnectionState"
           Value=""/>
    <Parameter Id="inverted" Name="Inverted" Type="Boolean" Value="true"/>
    <Parameter Id="bcmInputPins" Name="BCM Input Pins" Type="IntegerList" Value="4"/>
  </ParameterBag>
</Resource>
See strolch-plc-example-connections.xml for further examples.